How to create your own crypto token - the easy way
Notice: If you're reading this, you're early.
This is a work in progress.
ERC20
ERC20 is the global standard for fungible tokens.
WETH is the ERC20 version of ETH, for example.
The first one I’ve bought (and deployed) was SafeMoon.
After that I bought more then 400 tokens and deployed more then 60 ERC20 on various mainnet networks.
I’m not sure how many were for tests/testnets, probably over 1k.
I won’t go into depth on how the standard works. If you’re unfamiliar with the topic please search “ERC20 token what is solidity” on Google. Once you’re familiar you can come back and continue with the guide.
At the end of the page, you’ll find a complete .zip file with everything you need:
- Smart contracts
- Scripts
- Tests
- Guide
There’s no need for screenshots or OCR copy/paste. Just download the entire workspace if you think it could be valuable to you.
Here’s an ERC20, specifically Token.sol – the core of our token
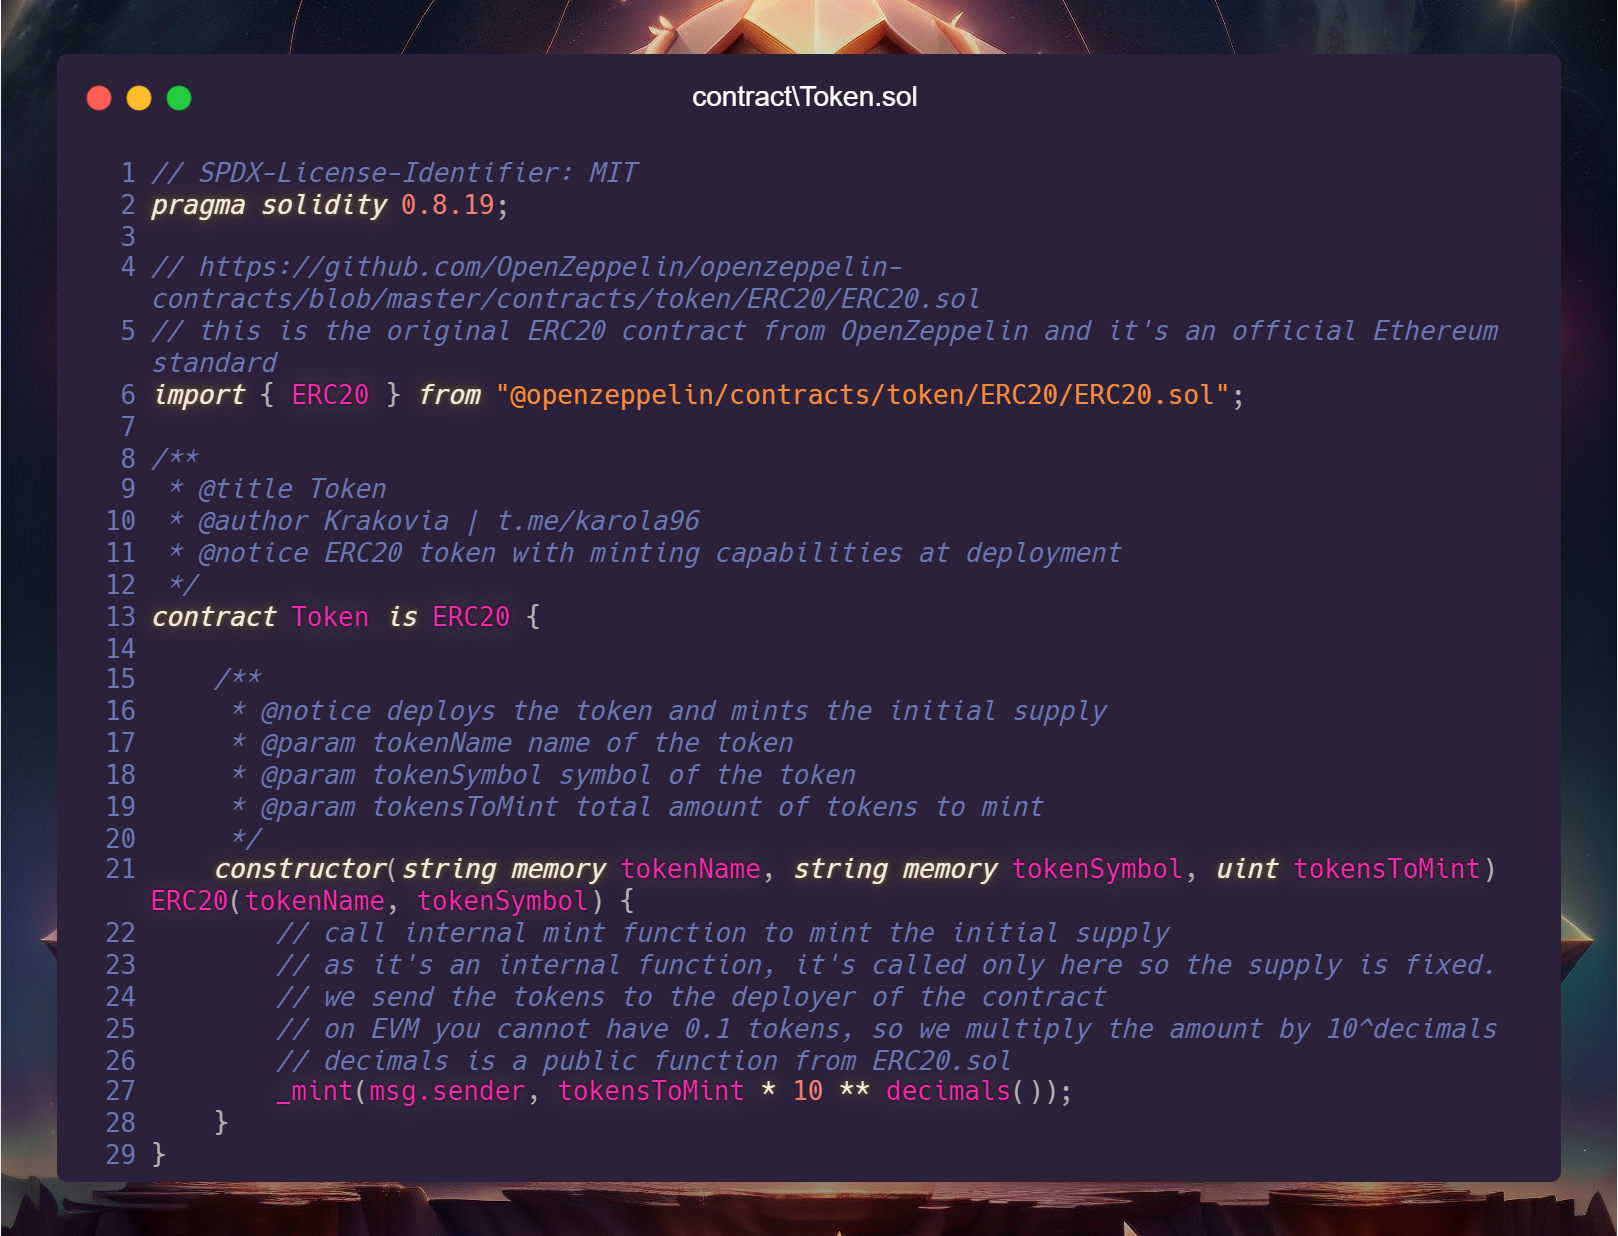
You can access the original ERC20 contract from OpenZeppelin at this link: OpenZeppelin ERC20.sol.
This contract is the official Ethereum standard for ERC20 tokens.
The code comments explain its functionality but in brief, once the code is deployed on-chain, the deploying account will receive the amount of tokens specified in the deployment transaction.
Now it’s time to download the workspace! Follow these steps:
1. Click this link –>[link].
2. Download and extract the .zip file into a new folder.
3. Install the necessary node modules using one package manager:
npm install
pnpm install
yarn install
Run the command:
npx hardhat test
You should see the output as shown here:
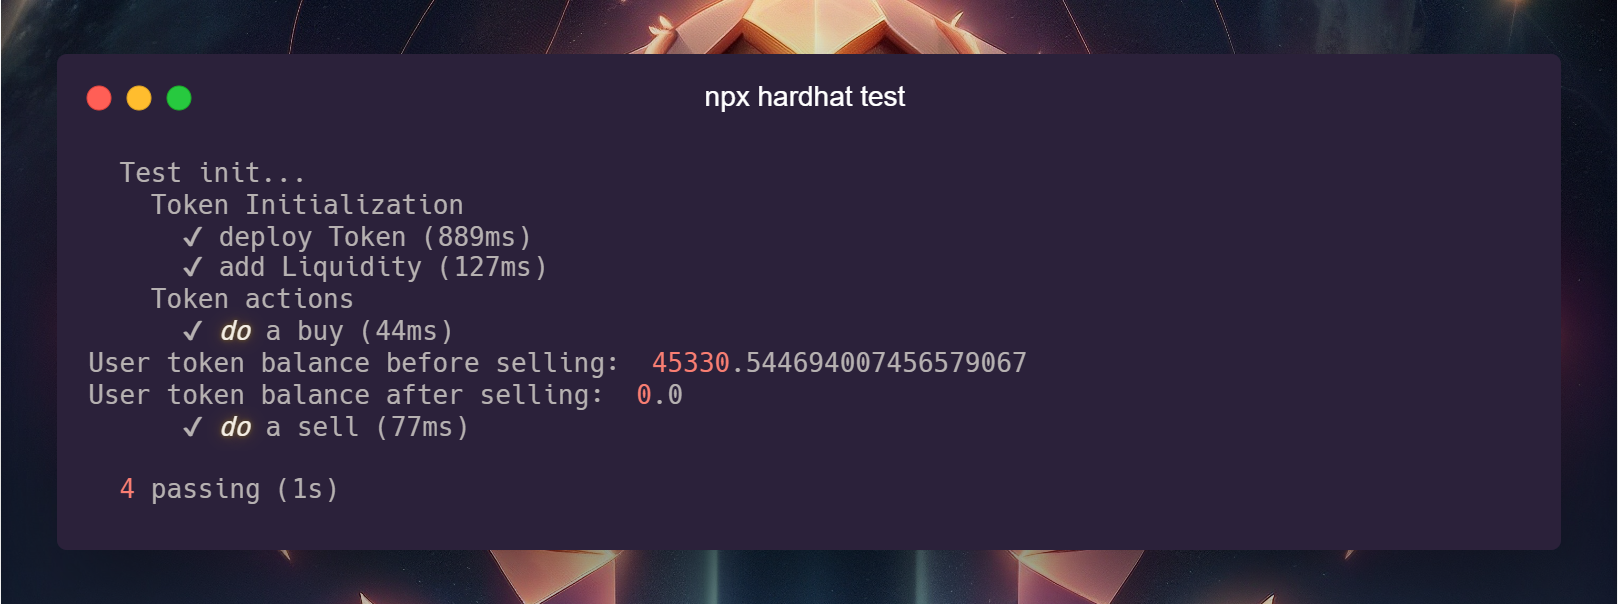
In just a matter of seconds:
- we’ve deployed the contract
- added liquidity to Uniswap
- checked the balances of the newly created pair
- performed buy and sell actions with a user
- checked the user balance
That’s it! we created our token and it’s now available on Uniswap!
(on localhost only! :D)
If you’re feeling like a superhero now, that’s exactly how I felt when I transitioned from Remix to HardHat. With this setup, you can operate as anyone on any blockchain, at any time, in any state, really fast & accurate.
However, that’s not the focus of this article so let’s return to our token!
You can edit your contract and run the same exact test (and checks) over and over again in short time to verify if it’s still working as expected.
That’s huge.
But we just started.
Now that we know everything is working, let’s analyze the actual code we just executed.
The command “npx hardhat test” runs all the test files in the /test folder, of which we have only one: /test/TestToken.js
Since these are JavaScript files, the initial lines are dedicated to importing necessary modules.
Chai is used for “expect” statements and Hardhat is used to execute the tests.

Hardhat tests are divided into sections and in our setup, we’re not utilizing fixtures. Instead, each test uses the same state as we want to keep things simple and avoid unnecessary complexity.
By default, when you run any script or test in Hardhat it uses the “hardhat” network.
If you look carefully our current setup is forking Ethereum network on startup in the hardhat netwok
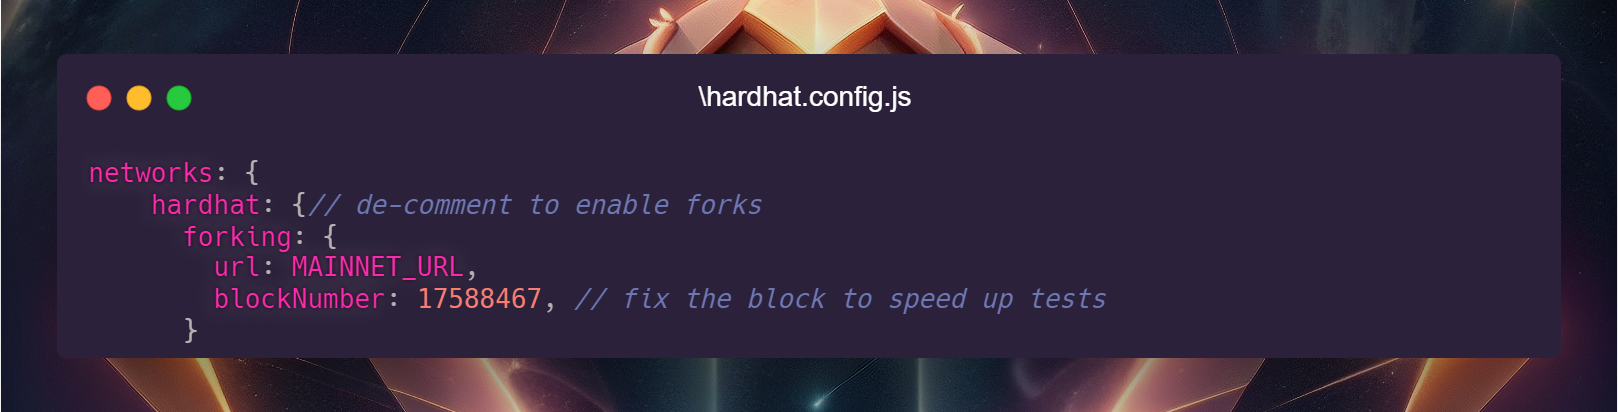
Here are some key points to remember:
- When forking a network at a specific blockNumber, any states beyond that block won’t be present in the fork. For instance, if you deploy a token on ETH, you won’t see it if you fork from block 17588467.
- you can remove “blockNumber” key from config to always fork ETH at the latest block available
- You can access ETH as if it were on your own PC and alter it’s state
Now let’s deploy in localhost!
Before doing this… please open the “.env” file in your root folder.
You’ll notice i’ve left a private key (NEVER DO THAT!)
It’s there to show you another cool superpower.
Let me show you.
First let’s run our script
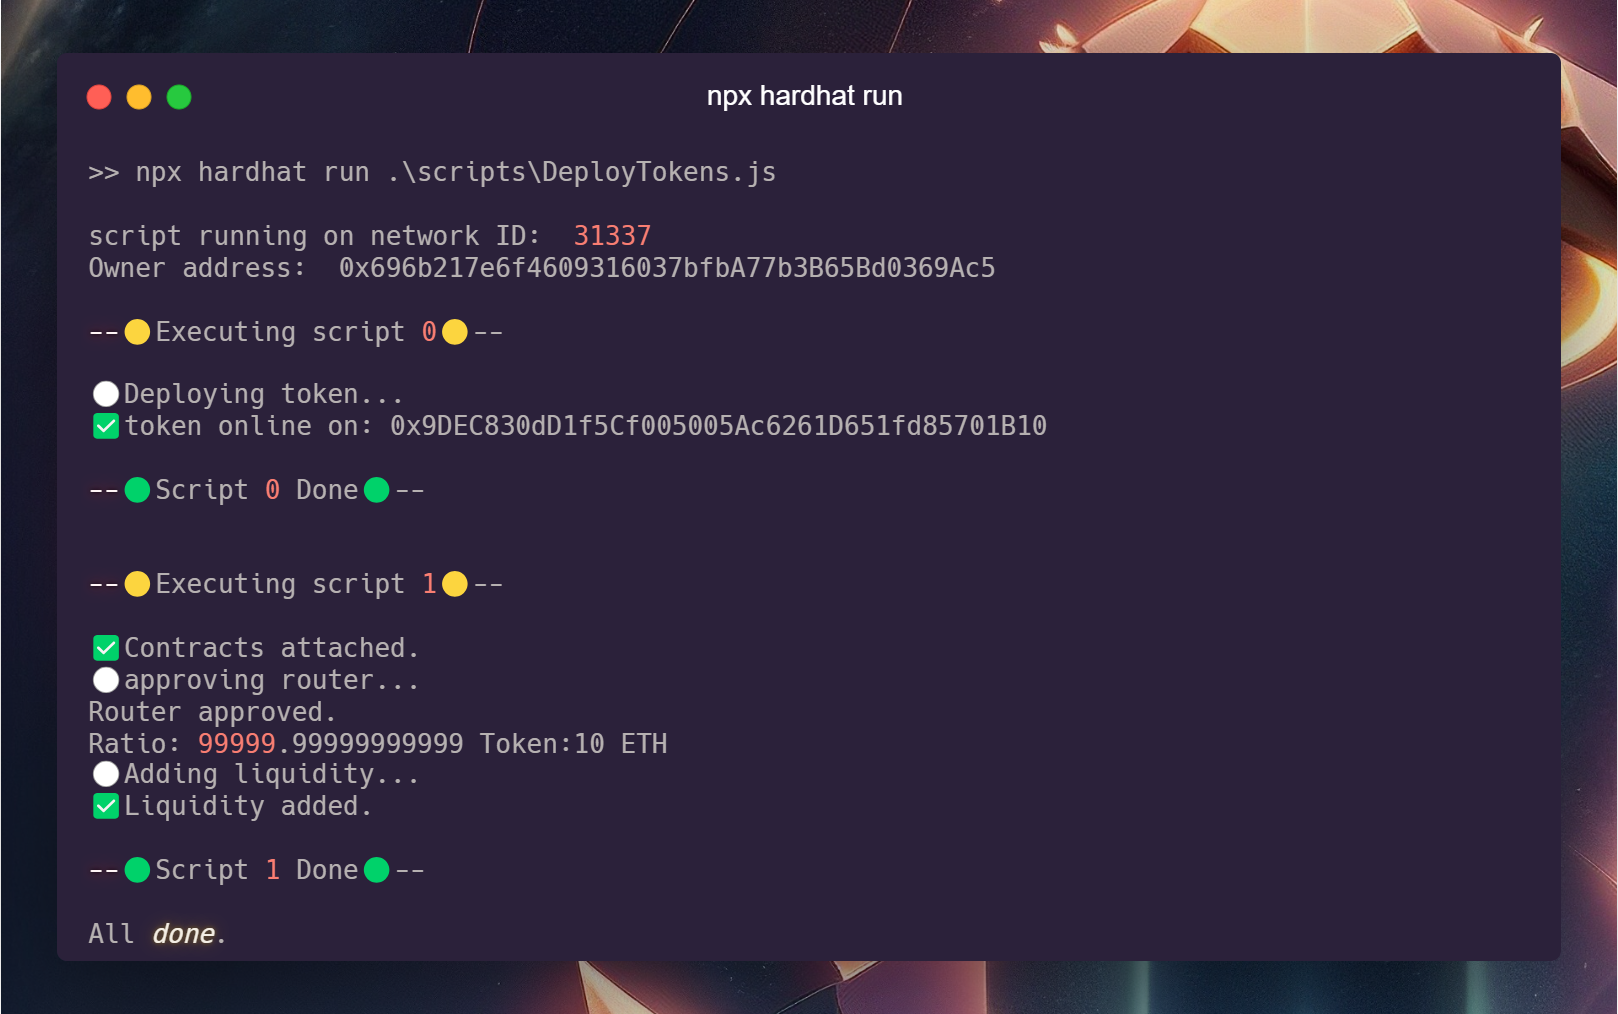
npx hardhat run .\scripts\DeployToken.js
You will get EXACTLY this.

Now… run it again!
You will get the same thing.
If you search for 0x9DEC830dD1f5Cf005005Ac6261D651fd85701B10 on Etherscan, you won’t find it. That’s normal, because we deployed it on localhost.
However, you might wonder why the address is the same.
The reason is that the contract address is derived from our private key + the account nonce
Even if you modify the contract code, the address will remain 0x9DEC830dD1f5Cf005005Ac6261D651fd85701B10.
Yes, you can obtain this address before deploying on the Ethereum mainnet.
I can assure you that this is the address that will be deployed, thanks to the deterministic nature of the EVM.
(Notice: at the moment of writing this is correct, if someone use that private key and make a transaction on Ethereum mainnet, the token deployed address will change!)
Let’s dive in the core concepts of the script.
By default when you run an hardhat script, one main function is executed.
In my workspace instead, we choose what should be done.
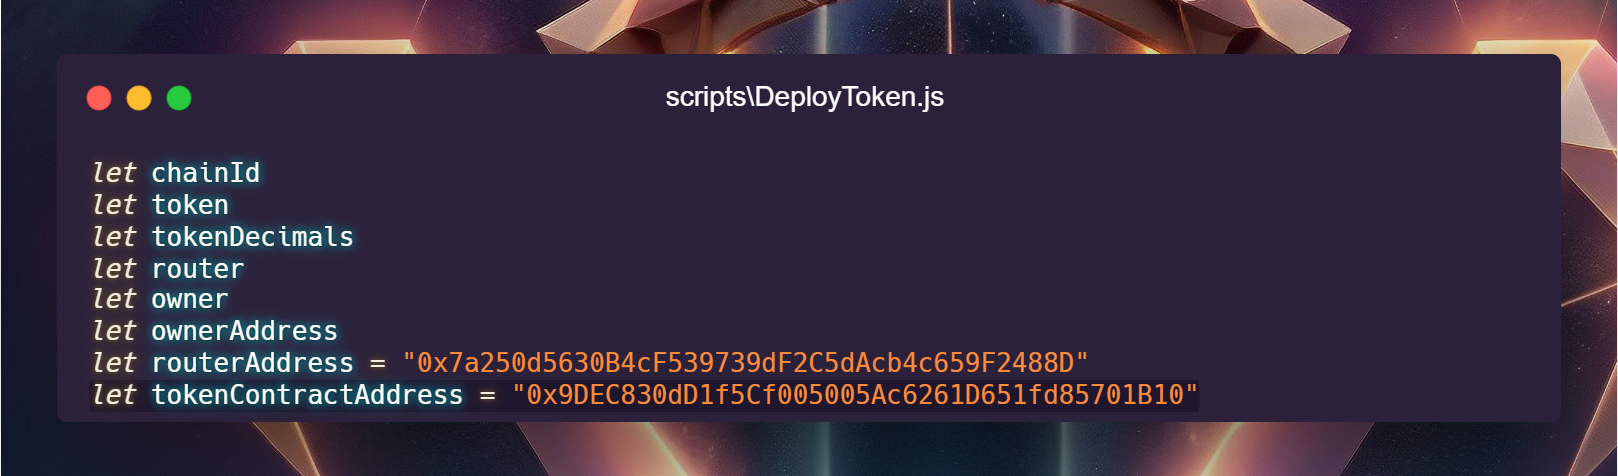
Starting from the top, import the necessary modules and define the global variables that will be used throughout the script.
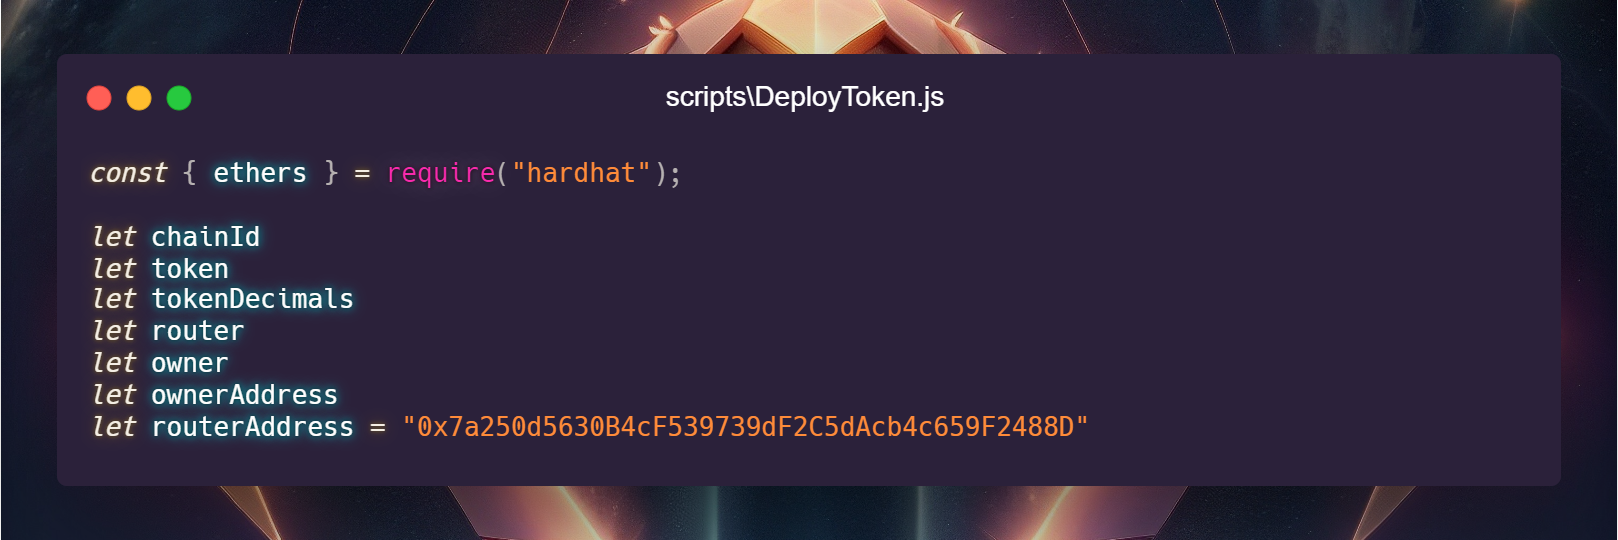
The router address is for the Uniswap v2 router at 0x7a250d5630B4cF539739dF2C5dAcb4c659F2488D.
Since we are forking the Ethereum mainnet, we’ll be adding liquidity there.
The following represents the core logic of the script:
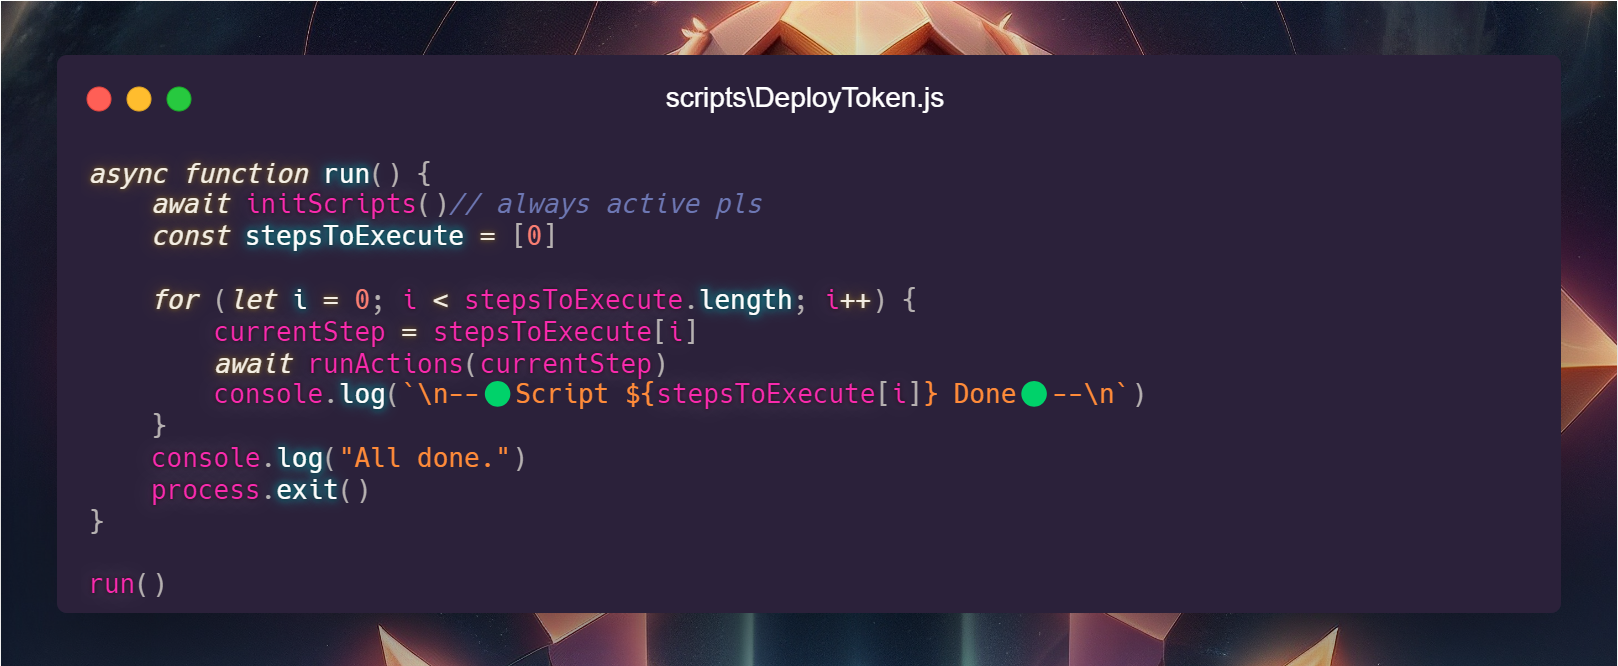
What the function does:
- Initializing the script
- Defining the tasks to be executed using “stepsToExecute” array
- Running through the tasks until completion
The function that determines which task to execute is defined here:
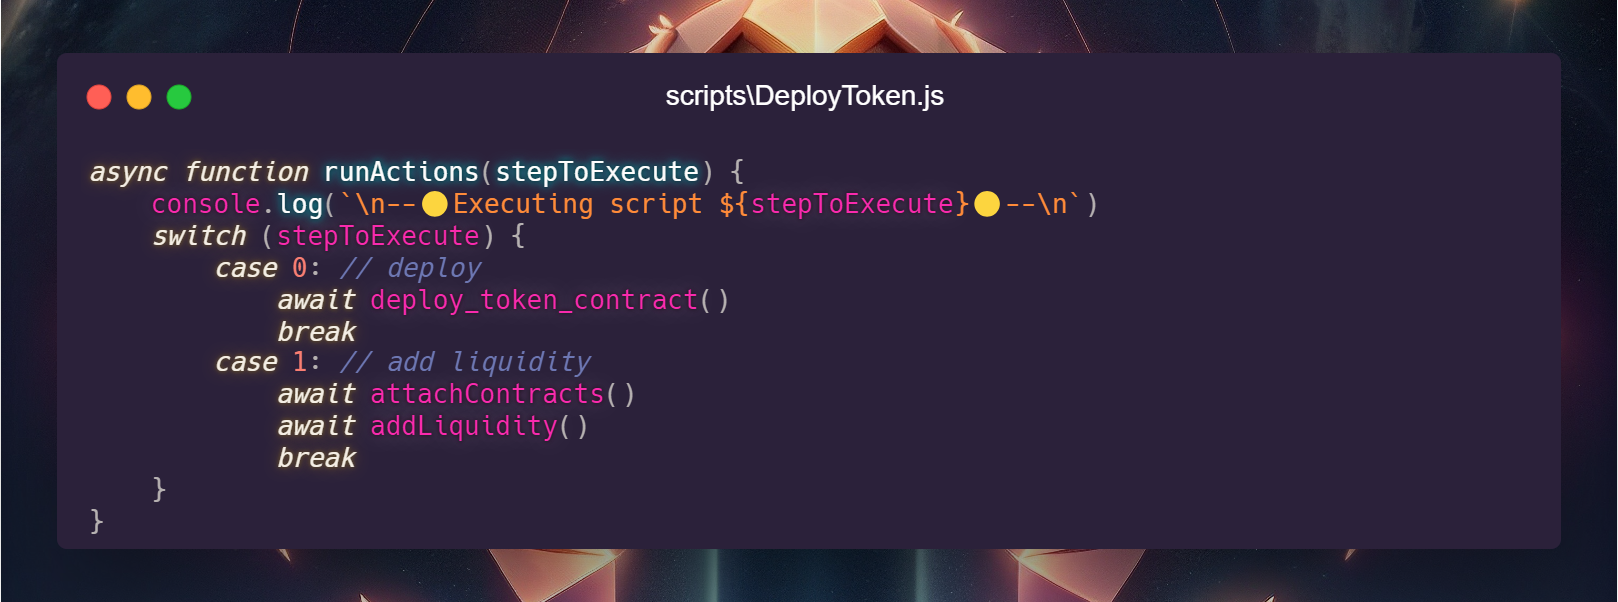
By default, the script runs case 0.
In our case, this corresponds to deploying the token contract and printing it’s address once deployment is confirmed.
Each function in this script represents a task, following this structure:

Within that function, we:
- Define local variables with token name, symbol and total tokens to mint
- Add console logs before and after the contract call
- Do the deployment tx & wait for it’s confirmation
- Print the deployed address
Now, you have two options:
1. Run cases 0 and 1 together, but comment out “await attachContracts()”
2. Apply the deployed code within the script
In most scenarios, it’s safer to proceed step by step. Run case 0 to obtain the deployment address. In our case, it’s 0x9DEC830dD1f5Cf005005Ac6261D651fd85701B10
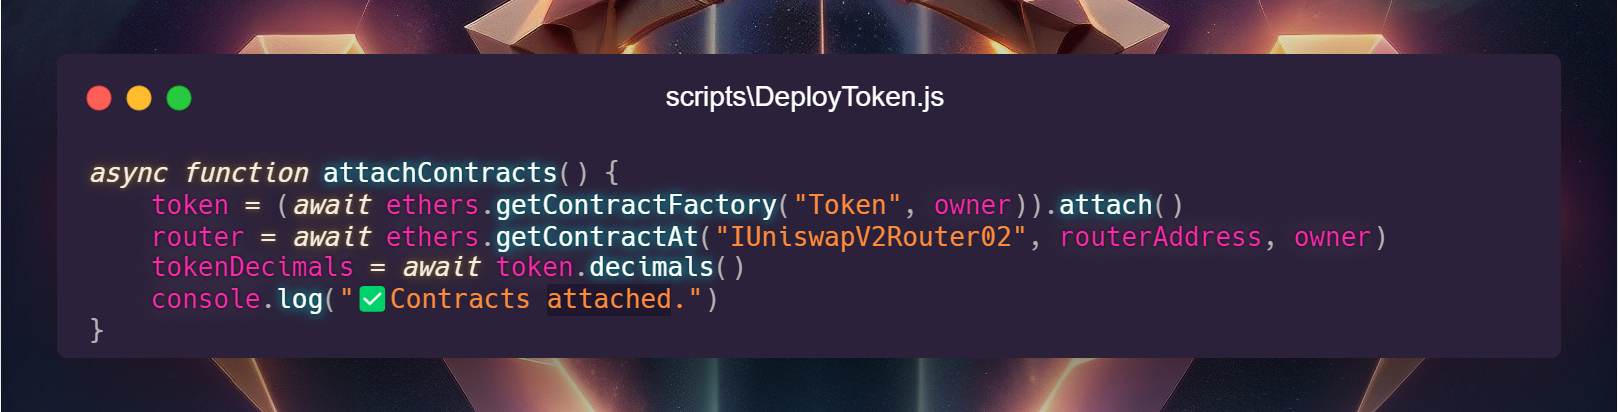
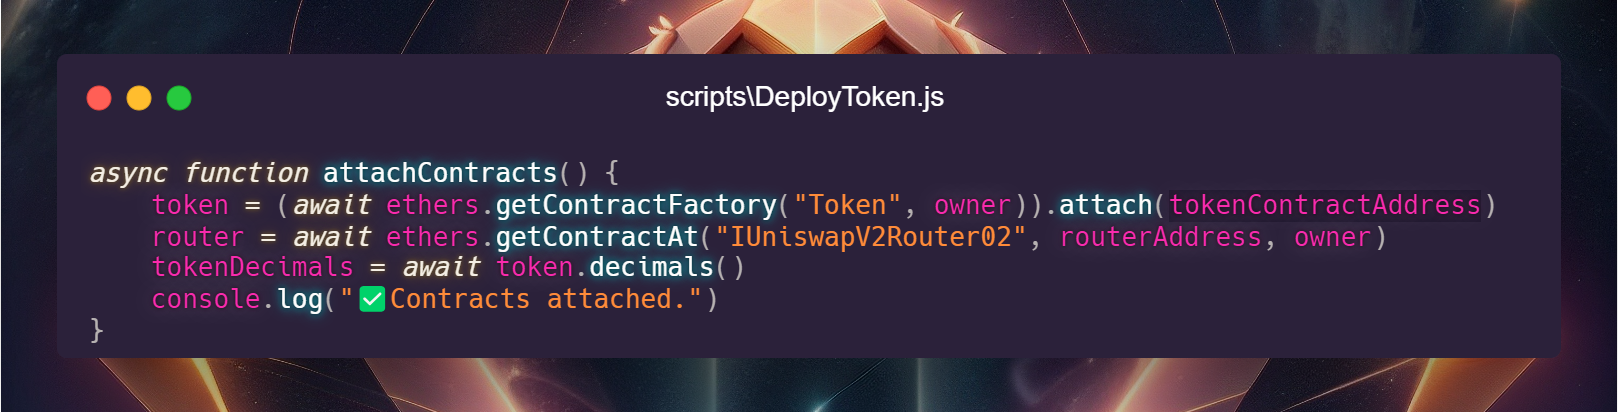
The “attachContracts” function is used to associate all the necessary contracts for executing one or more tasks.
Add the contract address we got from deployment script output to the global variables at the top of the file:
Then, modify the “token” variable inside our deployment script, passing the address as a parameter:
Now, whenever you need to run a task that involves interaction with our token and/or the router, you can directly call the “token” or “router” object within your functions.
Edit the “stepsToExecute” list and add case 1, like this:
					const stepsToExecute = [0, 1]
// 0 - deploy | 1 - attach & addLiq
Now, run the script again.
The script performed two tasks even though you executed only one command!
This mechanism provides significant **speed leverage**.
How?
It allows me to deliver contracts in a short period of time with low effort, without compromising security.
But what happened here? simple, we called addLiquidity() in the case 1
Let’s take a look
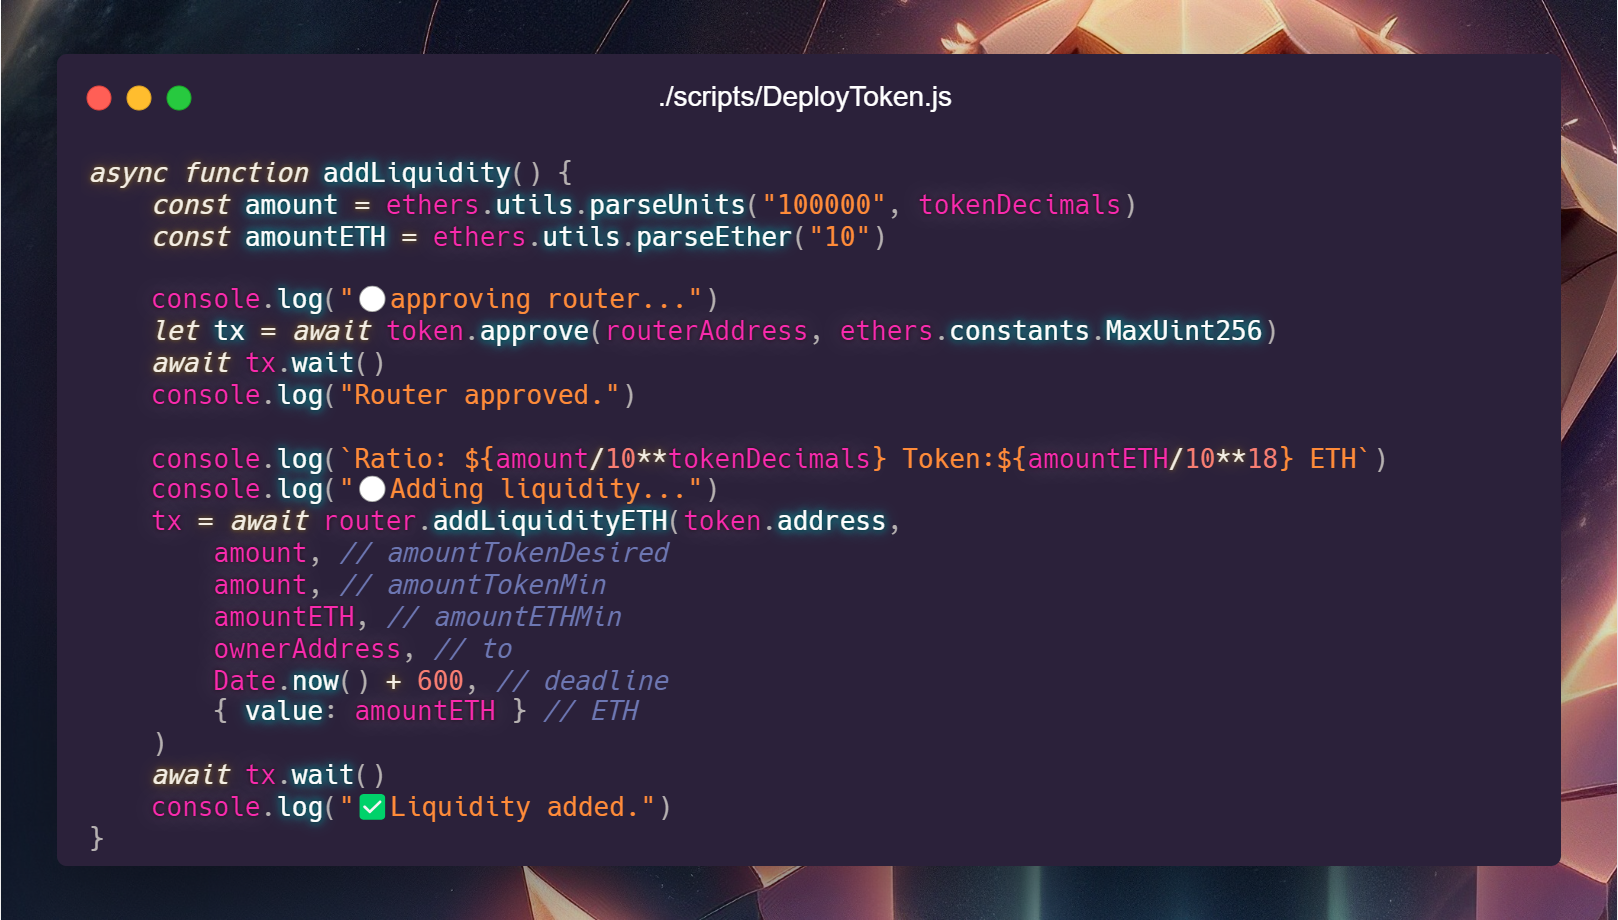
We define the amount of both tokens & ETH to add liquidity.
Remember that there are no decimals in Solidity. When you send 1 WETH to someone, you’re essentially sending this instruction to the WETH contract: “Hello! I’m 0x…0, and this signed transaction authorizes moving 1000000000000000000 WETH from me to 0x…1.”
Notice that enormous number? That’s 1 WETH represented as 1 * 10 ** 18 or 1 followed by 18 zeros. Always remember this when dealing with tokens and their decimals.
To improve the robustness of the scripts i always fetch the token’s decimals dynamically from the contract at runtime, which helps avoid unpleasant surprises that I encountered in my journey (see the call to token.decimals() under attachContracts()).
We then define the approve call. The deployer account is requesting the contract address to approve the router to move tokens on its behalf, which is necessary for how the router and ERC20 tokens function. When a contract needs to move tokens from another account, it must be authorized by the token’s owner.
Here’s a useful tip: If you send an approve transaction without waiting for its confirmation and then try to addLiquidity, the call will fail because the current chain state doesn’t include your approval yet. To “resolve” this, you can override the gas value and nonce of the addLiquidity call. Ethers will calculate the gas value automatically (and will fail) if you don’t override these fields. If you do override them, you can send the call just after the approve and it can get mined just after the approve call. Remember to do nonce + 1
However, there’s generally no urgency to execute these actions in a single block. It’s perfectly fine to follow the “workspace” approach: wait for the approval to be confirmed and then send the addLiquidity call.
Congratulations! Your token is now ready to go live!
Want to go on mainnet? Send this article to your developer and join the space!
Or if you’re a developer, just replace the private key in the .env file with your own and run the following script (case 0 only)
npx hardhat run .\scripts\DeployToken.js --network mainnet
I strongly suggest to avoid mainnet deployment if you’re not sure on what you’re doing.
I’m available for questions and inquires about anything you’ve read here as that’s what i do, daily.
This article is a showdown of what and how i do interact with smart contracts.
If you love Foundry instead, no worries.
You’ll find my foundry template too inside the zip, for each contract o/
This article doesn’t cover Foundry.
If you found this article helpful, please let me know.